How To Make: An Easy Loaf – My EveryDay Bread with No Kneading
This post has become far far bigger than I first thought it would, I’m trying to cover as much detail as possible to give the biggest chance of reproducing what I can in my little kitchen; a tasty easy loaf to fit around your busy day. That’s my criteria here if like me time is always short but you want to make a homemade loaf with minimum effort you can. With so much info and photos I hope I don’t achieve the opposite and make things appear more complicated than they are.
During this Spring I discovered middle daughter had developed a severe intolerance to soya, along with being allergic to dairy, fish, eggs, sesame, nuts, peas, beans, banana and intolerant to maize. Up until then we thought her body could cope with a small amount but after she spent weeks ill in bed missing school I finally cracked down on what was making her so ill. We had to stop all her soya products she relied on for snack or treats, she so misses her soya milk chocolate bars. The biggest changes for me was the loaf of bread for toast and sandwiches and soya sauce in our family meals which I used often to marinade meats or stir-fries.
It is almost impossible to buy a shop bought white loaf that does not contain soya flour, have a look next time you’re in the bread aisle. It’s easier to attempt an assault course than tracking down a soya-free loaf. If you try really hard in the big supermarkets where they have in-store bakery bread they might be one loaf from the uncut section, but you have to ask someone behind the counter to look up in the “Ingredients Book’...good luck with that! You pick 2 or 3 loaves at random take them to the counter ask to look up the ingredients, a lot of the time you wait for the book to be found, some employees don’t even know the book exist, flick through the book to find the loaves you’re holding to be told they contain soya. Pick up another set of loaves and start again.


I am a Lazy Baker – I want a good loaf with no hassle! How do you achieve that?
Wet sticky dough is the answer…and I have Dan Lepard’s sourdough to thank for that, it forced me to handle sticky dough.
Producing bread with no kneading or just a few folds like Dan Lepard does appears to have the same thing in common; wet sticky dough. I don’t why or when these methods started to happen but to the homebaker it appears to be something fairly new, the days of having to push and stretch your dough with the heal of your hand is no longer essential to produce a good loaf. Thank goodness is all I can say otherwise I would be really pulling my hair out making my daily bread for middle daughter.

The No-Knead Method and The Folding Method
I first came across the No Knead bread method through this blog, the italian dish, i’ve linked to where elaine has the no-knead bread entry, i like this blog, i don’t have free time much but i like to stop by from time to time and have a quick look. she mentions and links the bakers she’s taken this method from artisan bread in five blog who’s book; Artisan Bread in Five Minutes a Day has been bought by people I know who have had success with it. I haven’t followed recipes from either blogs but taken Dan’s sourdough recipe and inspired by this method have made loaves in the same vain of mix & rest, shape & rest…Bake.
Dan’s folding method is very straight forward and practically a no-knead method, I avoided using his folding method for a while because I couldn’t get my handle on the sticky sourdough but what I realised when making his sourdough properly was only folding it a few turns then resting actually made the dough easier to handle, if I carried on folding it too much then it would start getting sticky again (not a problem with dried yeast loaves). The other reason I avoided his folding method in the Handmade Loaf book was the timetable for the whole recipe took hours, practically a whole day.
Applying these Methods to the Dry Yeast Loaves
Dan has a good dried yeast loaf recipe and method here called Easy White Bread, where he instructs you to knead the dough just for 10 seconds on a lightly oiled board at about 10 minutes intervals, repeating this 3 times, shape it, let it rise and bake.
I make my daily loaves either using the no-knead method or if I have the time I sort of follow Dan’s method of folding…only I don’t put my dough on the board to fold...no…too much hassle...I’m that lazy! I fold the dough while it’s in the bowl. This means I have the dough proving in the kitchen and when I walk in I just quickly use my fingertips to pick the edge of the dough fold it to the middle, doing this all the way around the bowl, turn over the dough leaving the stretched side up, cover and leave it alone.
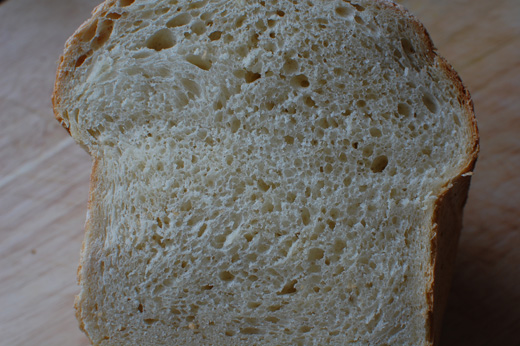
The crumb of the loaf below, baked in a tin using the 350g of liquid (500g flour) and folding in the bowl.
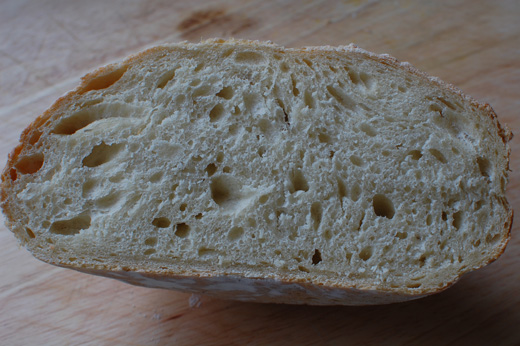
The crumb of the loaf below, don’t remember the water content, but the folding was done outside the bowl enabling bigger pockets of air into the mixture.
Folding and Texture
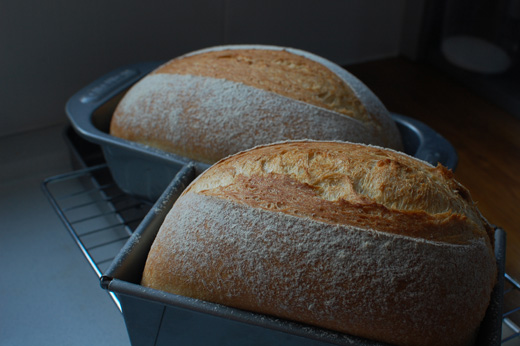
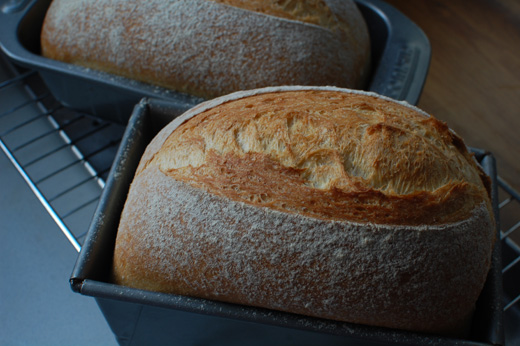
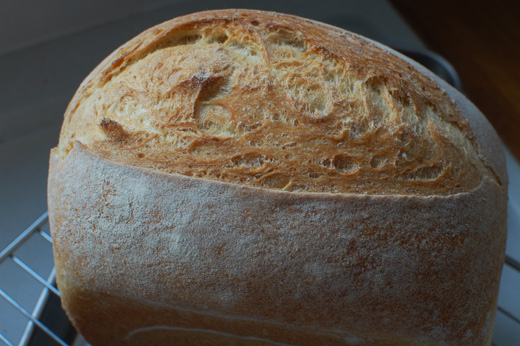
The photo at the top of this post of the two loaves and the photo below (of the same loaves) one of them was made using the No-Knead method the other using the Folding method. The loaves are baked in different lengths and depths tins so you can’t compare them in terms of height but both had a good rise in the oven and you certainly can’t tell by looking alone which is which.
So why Fold it? Because it changes the crumb texture, it will give you a chewier texture than if you don’t, it will give more of an open texture, you’ll have bigger holes. To maximise the chance of incorporating big holes into the crumb making the texture even more open, then I would take the dough out of the bowl every time on to the oiled board to fold it rather than doing it inside the bowl, this allows for bigger movements swallowing big air pockets into the dough.
If you don’t Fold it? You’ll have a good loaf just like the one in the photos (top of post & one below) but the crumb will be denser and softer, my middle daughter actually prefers this crumb, so it’s entirely personal, but if you try both ways you can see which you prefer.
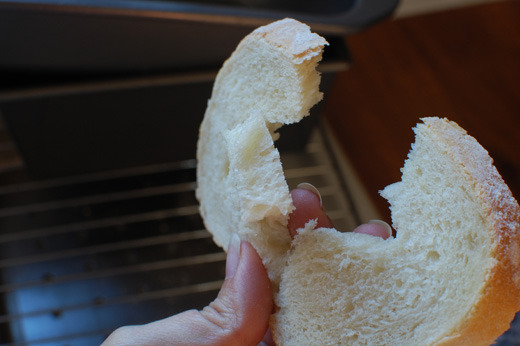
The photo below of the slice of bread is a loaf I made and neglected. I was going to fold it but forgot when I went back into the kitchen it was at the end of it’s initial rising time, I made one very quick fold left it 20 mins and shaped it, placed it in the tin, rise until just pass the edge of the tin and baked it. This crumb texture is typical of what you have when you make the no-knead method, a denser texture, very soft, one which my middle daughter loves.
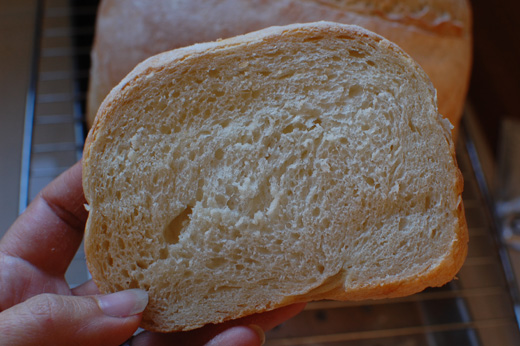
Just to show how soft the crumb is I’ve pushed my finger lightly into the crumb and look at the indentation it’s created, in a loaf that has been more ‘worked on’, more open texture, there’s more resistance than this, it bounces back more. It’s very much personal preference.


Sticky Doughs and Holes
I have noticed the correlation between wet doughs and more holes in your crumb. This is more noticeable in a sourdough but as I’ve experimented with reducing the water content in the mixture in both types of bread using the no-knead method, so not incorporating air into the dough, I’ve noticed the crumb being tighter, we’re talking as small as a 30 grms of liquid reduction.

Over-Proving and Under-Proving
The normal advice I’ve read in books about proving until double the size I’ve never found very helpful since you can leave a dough to over-prove quite easily because you’re waiting to see if it’s really double in size or maybe nearly double in size and by the time you make the decision the yeast can have given most of its ‘umph’ and you’ll end up with a loaf that is poor in the rising when in the oven. I’m a fan of under-proving because the loaf will have a lovely ‘oven spring’.
There’s a big difference in the proving time if making bread in a really hot summer’s day to making it now. I don’t rise it in an airing cupboard, I just don’t see the need for it, I leave it at my kitchen temperature and never have problems with it rising. I don’t wait for the dough to max out in the proving, just as long as it has risen and I can see activity going on I’m happy...I’ve put some of my loaves through some trying times. I mix the dough with warm water from the tap, bit more than luke warm and then leave it on my kitchen top. The heat in my kitchen will vary from what time of day I’m making the loaf, in the evenings it will be hot from having the oven on and stove full of pots and during the day it will be cold as I have no heating in there.
This weekend I really pushed the dough, I had weighed it out and left if in the bowl of the scales which is metal not bothered transferring into the usual plastic bowl. I then placed the metal bowl by the side of the stove as normal but forgot that the metal was conducting lovely heat, when I noticed I had to act fast, fold it and do the last rising. I’ve noticed a difference between a dried yeast loaf and a sourdough in the over proving, sourdoughs act slower and therefore more forgiving, the window is longer.

Oven Spring
I discovered what a great result you can have with ‘oven spring’ when I kept having trouble letting my sourdoughs have the second rise on a baking sheet. They use to spread terribly as you can see from this post of mine, and it forced me to leave the loaves for the last rise very briefly just long enough to let my oven come up to temperature, about 20 mins, I would then see it have a lovely rise in the oven. Many times because of time constraints I’ll still do that with my loaves. If you look at the photo above and the second photo of this post (same loaf) you’ll see how incredibly round the shape is…well it’s that shape because I only gave the last rise 20 mins and it sprung into that ball shape in the oven. I have the step by step photos of it at the very bottom of this post and you can see the ‘oven spring’ happening in the oven.
Using the Right Flour
It was through Dan’s forum recently I discovered how flours can make a difference to your dough, how it feels, how tacky it is, how easier it is to handle and even in the result of the bread once baked, such as the crumb. There’s a thread on the forum from a baker complaining about Alison’s flour and through side by side testing using different flours it’s clear to see a difference in the results. I realised then some of the problems I was having with my sourdoughs spreading was because I was using Allison’s flour, it makes a very tacky dough, especially noticeable using doughs like this that contain a high percentage of water.
As far as flavour goes I didn’t noticed Allison’s flour making a bad tasting loaf, not when tasting on it’s own without making side by side comparison, a duller colour I think. It is in the handling of the sticky dough where now I can feel and see the difference having changed away from Allison’s flour. Now I use either Waitrose organic, Waitrose Canadian Strong White, Carr’s Flour or Dove Organic.
Oiling Your Board and Hands to Fold
This little trick of lightly oiling your work surface and your hands to handle the dough is something that Dan Lepard and Paul Hollywood advice and good advice it is too. This stops you from adding too much flour when handling the dough and changing the ratio of flour to water, which will also change your results. Not the end of the world by the way just look at how much flour I first started to use on my board when I couldn’t get to grips with sticky dough here. When I look at that now I want to smack my hand! But you can see from the photo I still ended up with a good loaf, like I said not the end of the world!
I have one problem with the idea of oiling the board and hands if folding a few times on the board which is, the oil interferes with the dough sticking together a bit. I rely on a certain amount of stickyness for the folding to stick and give me a seamless result in the dough, the oil acts like a barrier preventing that. My advice is to use it with caution and see how it goes for you, if it bothers you that much then fold the dough in the bowl and only take it out to shape using little oil. This of course is no problem if you follow the no-knead method since you’re not touching it until folding anyway.
Folding – I’m Hopeless
Seriously I’m a bad shaper, this is why you’ll see mainly boule shapes and I can just about make an elongated shape but that’s it. I’m considering taking a workshop with Dan just to learn about shaping. The boule shape is easy because as you turn the dough on the board to fold it and pushing it into the middle you’re created a round tight shape, the action is shaping it for you.
Water In The Oven – Crust
There is different ways to putting steam into your hot oven which is what will give a lovely crust. Some people add a water tray while the oven is warming up and once it’s at the right temperature they remove it, others remove the water tray half way. I prefer to have a large wide oven tray heating up on the bottom of the oven empty and then add a pint (500ml) of cold water to that hot tray just before adding the bread. The pint of water in that wide tray will evaporate halfway through the baking so no need to remove it.
Crust Softening
I love a crust on bread and sometimes it can soften too much once out of the oven, I notice this a lot with sourdough, but sourdough is a little more complicated because it’s easy to underbake it and that will soften the crust considerably, resolvable by putting it back in the oven. With a dried yeast loaf a crust can soften quickly if the room is warm or has a lot of moisture.
Liquid and Fat
Dan doesn’t use any oil in his dried yeast loaf I’ve linked to above Easy White Loaf nor does he in his white sourdough but I do because I find the loaf lasts better the following day than if you don’t. I use olive oil, not extra virgin because I find it tastes too strong for me in the loaf, and I don’t add more than 20 grms, again because I begin to taste the olive oil in the finished loaf when I don’t want that effect. You can use any vegetable oil of your choice and cut down to 10 grams if you want to but just increase the water to match the same overall total of liquid.
I haven’t written out here in great detail the methods as I’ve put so much information into the sections of this post and throughout the step-by-step photos. This post has taken quite a while to put together and I want to post it as is for now but will come back and add the amounts in cups.
Oven Temperature 220C / Fan 200C / 425F / Gas 7 Bake for 35 – 40 mins.
Oven must be at the right temperature and don’t forget adding the pint of cold water to the hot tray heating up at the bottom of the oven.
Easy White Loaf No 1
- 500 gms white bread flour
- 10 gms salt
- 1 x (7 gms) sachet of easy fast yeast
- 300 gms warm water
- 20 gms oil
Mix everything together. Follow one of the methods below of either leaving it and letting rise between an hour and an hour and half, and only folding when it’s time to shape it and leave to rise again between 20 mins – 45 mins.
Other method is to keep on folding it during that first hour to hour and half at intervals between 2 or 3 times, shape and let it rise as above.
Easy White Loaf No. 2
- 500 gms white bread flour
- 10 gms salt
- 1 x (7 gms) sachet of easy fast yeast
- 330 gms of water
- 20 gms of oil
Mix everything together.
Mixing a Wet Sticky Dough
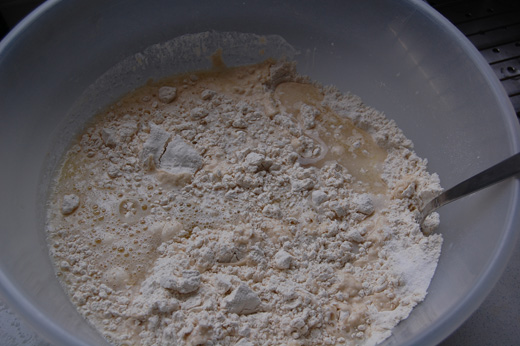
Mix the flour, yeast and salt.

Add your water and oil
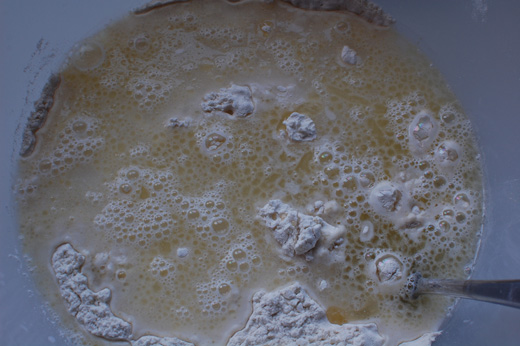
Stir everything.


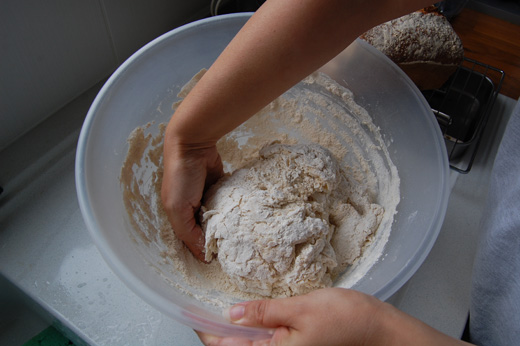
Using your fingertips lift the mixture and fold it into the middle. Luckily for these sets of photos I had one of the girls to take them, so I could show how I use one hand to turn the bowl and the other to turn over the dough.


Keep on lifting the dough with your fingertips and pushing the dough into the middle.


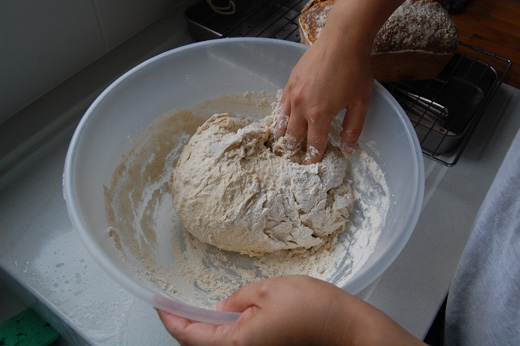
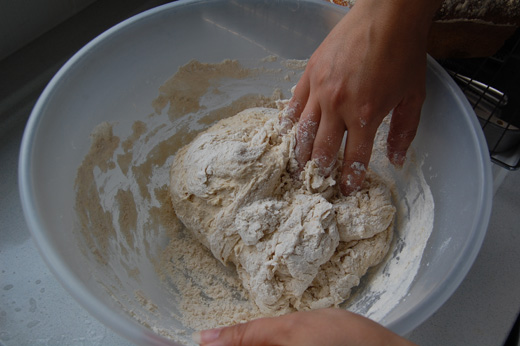
I don’t get the palms sticky, just use the fingertips.
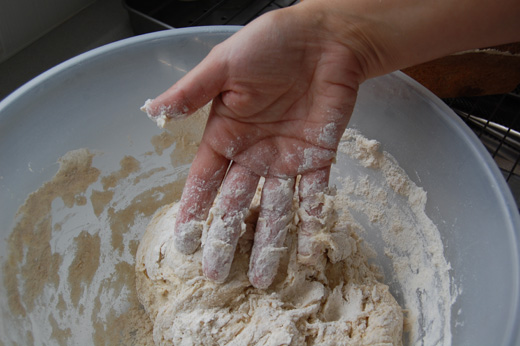

Make sure the dough is very well mixed.
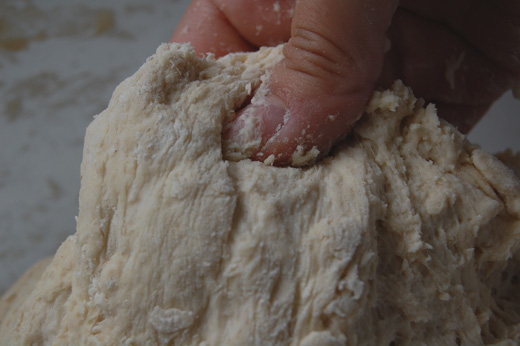
Make sure any flour pockets are well mixed.

Until the dough is very sticky.

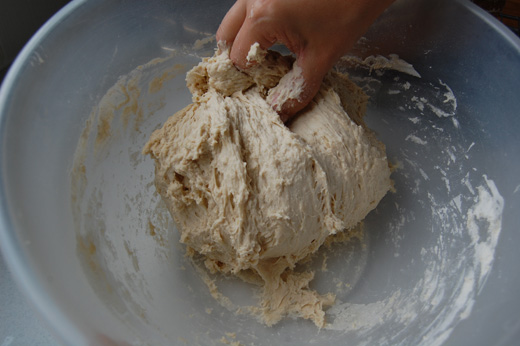


Cover with a wet teatowel or clingfilm and let it rest.

After a period of rest you’ll see little circular air pockets from burst bubbles forming.

The First Fold
Using the same method when you first mixed the dough of only using your fingertips of lifting the dough and pushing into the middle of the dough, and the other hand keep turning the bowl.
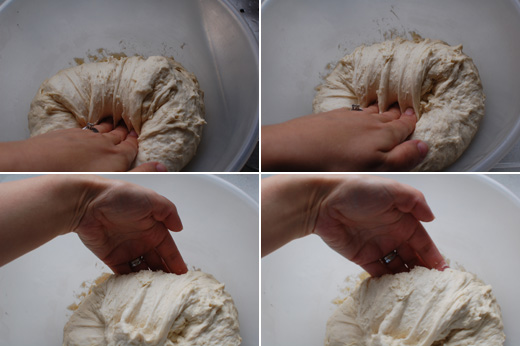

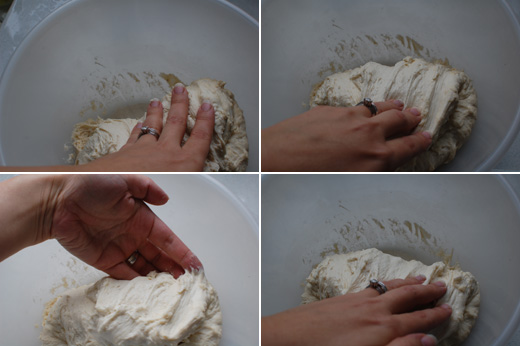

Turn the dough over, cover the dough and let it rest and rise again.

The dough will inflate up full of bubbles under the surface.

Second Fold
This time you’ll feel the dough squeek and bouncy like it’s full of air.

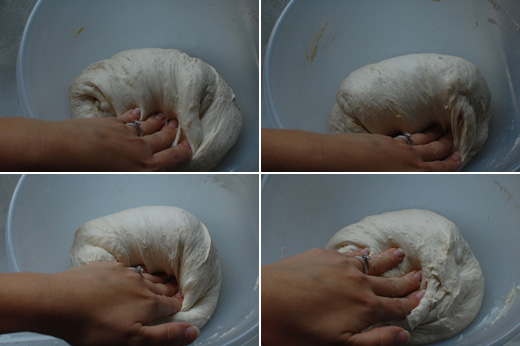
Third Fold or Shaping
After two folds you can shape the dough ready for the rise before baking, but if you have the time you can let it rest one last time.


Shaping the Dough
Turn it out on to an oiled board shape into what you want, for free-style boule or to go into a tin.
Once it’s shaped and on a baking sheet or tin – dust it with flour.
The No-Knead Loaf (Not Folded Dough)
If you’re not folding the dough leave to rise until it’s quite risen, you’ll see bubbles under the surface, see the third photo below how far up the bowl it’s risen, the length will depend on the temperature of the room but on a cool atmosphere leave it between an hour to hour and half.
The dough on the left is the folded one and the right is the no-knead dough.
You can see how much the No-Knead dough (Left) has risen up the bowl, and it’s full of nice bubbles.
Shaping the dough is important with this one because you haven’t folded it at all so you want to fold some airy bubbles into it with bigger movements than the bowl will allow you, it should be placed on a lightly oiled board with a little oiled fingers and folded into a tight shape.
Turn it out on to an oiled board, oil you hands a little and fold it following the same steps as above.
Place your dough into the tins if using and let it rise.
I like to let the dough rise in the tin up to the point it’s just beginning to go past the edge of the tin.
Using a small serrated knife, or your craft knife cut big slash in the dough.
Bake it in the pre-heated oven that you have just poured a pint of cold water into the hot tray at the bottom of the oven, to create steam and give the crust.
Shaping the Dough in the Bowl.
This dough I made today I was in a hurry, I folded it twice in the bowl and the third folding of the shaping instead of turning it out on to the oiled board to save some time I just shaped it into a boule shape while in the bowl and placed it on the floured baking sheet for the last rise before baking. Because I was running out of time I only let the last rise while the oven came up to temperature, 20 mins, which meant it will have a good ‘oven spring’.
These folding steps below are over a period of about an hour and half in total until the final shaping and then 20 mins for the rise before baking. The kitchen was quite cold. I followed the same as above of folding covering and resting twice and then the folding for the shaping.
By the time it came to the final folding for shaping you can see below the big airy bubbles.
The dough starts off sticky by the time you’ve made your folds and take the dough out of the bowl, the bowl is left nice and clean, not sticky dough anymore.
Even with leaving the dough a short period for the last rise before baking it will still rise, mainly in the oven, the ‘oven spring’.
