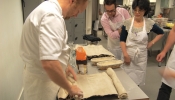
I’ve been experimenting with focaccia dough using a little potato flour but to disastrous results, I have a fickle relationship with potato flour in bread, use it successfully in allergy kid’s loaf but other experiments the dough collapses on me. I’ve also experimented with a 100% sourdough focaccia but hasn’t so far resulted as good as this hybrid version. This was one of the breads Dan had his class make in his workshop, using his levain. Focaccia is a good introduction to handling sticky dough.
This recipe follows Dan’s Olive Oil Flatbread in The Handmade Loaf, I’ve reduced the oil in the recipe, and replaced the fresh yeast for dried because that’s what I have in the house. Dan said in his sourdough workshop that in Italy they make focaccia slightly different but I’m not sure how different. This may not be the genuine article but it sure is tasty.
I’ve been wanting to make a focaccia using a method I first saw in Gary Rhodes’ programme, Rhodes Around Italy where Italian chef Fausto Oneto at the very end mixes in a bottle, water and extra virgin olive oil equal amounts, then pours it over the top of the dough before baking. I will try it next and see what I think of it but first I wanted to make a good version of a focaccia to have a basis to compare it against, here’s the video of Fausto Oneto making his yeast version, skip to the end for the water & oil mix.
If, by the way you’re wondering why he adds malt to the mixture, and I did wonder myself months back, it adds flavour, which is good for a yeast dough. Malt also aids colouring of the dough and is source of food for yeast, remembering this a relatively short baked dough. Here’s my post on why bakers add malt. I suspect the water poured on the dough acts like a good steam oven, stops the top from hardening before the crumb has had time to set. I also paid close attention to what Fausto said about the water & oil mixture entering the holes and making that bit of the crust a creamy texture in contrast to the crisp parts.

Crisp Crust
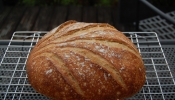
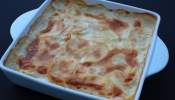
Talking of crisp crust, that’s something I’ve noticed on focaccia while it’s still fresh. With the amount of olive oil it has on top it develops this thin crisp crust, essentially a fried crust, which I think is a delightful contrast to the soft airy interior.
This crisp crust you miss out when eating a bought focaccia made hours beforehand, because later that crispness softens and you’re left with one texture dough. Not a bad dough at all, but I would urge you to make one at home and eat it while warm and experience the combination.

Sourdough Focaccia
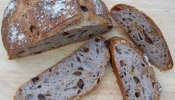
I’m yet to make a 100% sourdough focaccia that I’m very happy with when it comes to the crumb texture. I think I now have more of a clue on how to further experiment with one, having recently played around with 2 hr fed levain (see here for details) and reducing the levain amounts in the total recipe, to have more of a soft springy texture and less of the waxy sourdough feel.
This is the perfect happy marriage for me, of a sourdough flavour and soft non-waxy texture delivered from the added yeast. I am a sourdough lover but not at the expensive of the right texture for a particular dough.
If for whatever reason you want to leave out the added yeast, I made Dan’s recipe omitting the added yeast but adding all of the olive oil ( 80 grm ) when making my Olive Oil & Olive Sourdough and it resulted in a very soft textured crumb, more so than any other sourdough I have made thus far. And I think that’s a good compromise.

I have a good height on mine especially using only 2 grams of yeast (literally a large pinch). This partly because I use young fed levain and the other reason is the size of the tin I use 20cm x 30cm (9 inch x 12 inch). You can not be worrying about how generous you have to be with the olive oil when oiling the tin and drizzling over the top, lots of flavour you’re adding.
You can make an all yeast focaccia, add 7 grams of dried yeast or double that of fresh yeast.
Focaccia
Dough
- 500g white bread flour
- 10g fine salt
- 2g dried yeast
- 200g leaven (100% hydration used after 3 hrs of last feed, see here)
- 320g water
- 30g extra virgin olive oil
- sea salt crystals for the topping
- extra virgin olive oil for tin, folding and topping
- Any herbs for topping or/and sliced onions (soaked in water first)

Mix all of the dough ingredients together, I like to make sure I pour the oil on top of the water direct and then mix it into the water with my finger, it distributes the oil evenly quicker.
Mix until you have a sticky dough. My dough below is particularly wet because I’m using a lowish protein bread flour of 12%, but it ‘s good to see how it’s still a manageable dough.
After mixing cover the bowl and leave it to rest for 30 mins or so.


You can oil your fingers like Dan suggests to stop them from sticking to the dough but I’m just so use to sticky dough it doesn’t bother me.

Picking up the dough by the side of it fold it on to the middle of it. Do this a couple of times around the bowl. I have more detail info on this Walnut & Raisin bread post on folding.


Leave it again to rest. How long you leave doesn’t matter too much you can fold it again when you see activity going on like I have, bubble forming.
I folded this dough twice and rested but it can be just folding it once if you’re in a hurry.

Then I tip the dough on to the very very oiled tin.

Make sure there’s enough oil to cover thin layer bottom of tin, and with your fingers oil the sides of tin.

Tip the dough into tin.

As you do so you can see what I call ‘stringy vest’, of all the little bubbles of activity going on underneath the dough. Now the underneath of the dough is facing me.

Using oiled hands pick up the dough at one end stretching lightly and fold it into the middle of itself.


Repeat the other side.


Do the same with the ends of the dough.

As you fold it pat it down gently so the ends stay put.


You should feel the dough is like a bouncy pillow of air.

Pick up the dough and turn it over.


Lightly but firmly pat the dough a little out making it spread outwards…don’t be too precious with it but DON’T take out your frustration on it.

Now make the holes with your fingertips, I have to do it with my knuckles because I have nails!

Press to make holes all the way down to make proper indentations.

I’m not very good at making level rows of holes in my focaccia, or rather I like the haphazard look of the rough holes I make! It’s handmade.
As you are making the holes push the dough in an outwardly fashion spreading the dough out to cover more of the tin. But don’t worry if the dough doesn’t yet cover the bottom of the tin. Leave it and come back after 10-15mins rest and using your oiled fingertips placed them under the dough and gently pull the edges of the dough outwards more.
The resting period allows the dough to relax a bit making it easier to stretch, it’s what bakers do when the dough fights against your shaping and springs back on to itself. Giving short rests allows it to be more placid.

The reason you don’t want to take out your frustration on your poor dough is so not to burst the lovely big airy bubbles it’s been creating.


Making this dough today it was hot and I think it was about 30 mins before it had risen enough up the tin when I was happy with it to go into the oven.

Drizzle lots of extra virgin olive oil, pinch of sea salt crystals and your favourite herb.

Bake in well pre-heated oven to 200C fan / 220C / 430F with steam for 35 mins. See Walnut & Raisin post for steam oven details.


Below, the focaccia made in Dan’s workshop.


{ 8 comments… read them below or add one }
Aziléa,
I’ve followed a simlar path in pursuit of foccacia, ending up with malt extract in the dough and a topping of an emulsion of water and olive oil.
This came about from crossing several recipes for foccacia; I can’t place where the malt idea came from (I thought an Ottolenghi but checking now I can’t find it) but the topping I got from Locatelli “Made in Italy” where it is referred to as “salamoia”.
When I’d tried just oil, the crust seemed to almost fry, but the emulsion of oil & water gives an oil rich finish but still moist and with a great crust, possibly as you suggest due to a localised steamy atmosphe around the surface.
Incidentally both of the foccacia recipes I mention above come from Dan’s consultancy work in the respective restaurants, though he tends to distance himself from the domestic re-interpretations (even where they give credit) as the scaling to domestic versions is not his work (or responsibility).
Hi Bluebear – I’ve seen malt added to all sorts of dough, bagels, pizza, this one, it seems usually with yeast quick doughs. I will try the water & oil topping but I must confess I like the “fried” taste effect of the crust.
Beautiful looking dough, Azelia, so moist.
The salamoia in Giorgio Locatelli’s book is Dan’s recipe – he wrote the breads for that cookbook! I have tried it with that topping, and I think you still get a crisp top – not sure whether what you suggest about it keeping the top moist as the dough expands is true, as I didn’t do it side-by-side with only oil.
I made this recipe in Dan’s class too, but haven’t made it since. I may just have to give it another go soon.
hi Louise – yes he did the breads and took the photos, the very multi-talented Dan!
If you mean when I said pouring the water & oil over the top acts as a “steam oven” that’s different from keeping the top of the bread moist at the end of baking it. The idea of a ‘steam oven’ when baking bread is keeping the atmosphere of the oven moist with steam in order to stop the crust of the dough from hardening in the beginning of baking. The reason you want to avoid that happening is the crumb needs to set first and it does that by the gases like carbon dioxide inside expanding and rising the dough, if while doing this the outside crust sets the crumb doesn’t expand fully to its potential, it will essentially hit a brick wall.
If you think of an oven as a drying machine while there’s moisture the surface of the bread will take time hardening. The perfect combination is having enough water so it dries up halfway through baking, then you can have a nice hard crust with your crumb being light, having allowed all the gases inside expand.
And that’s what I think they are doing with the water on the surface of the dough in the recipe I saw, essentially creating a steam atmosphere for the crust, allowing the crumb to expand and then that water will evaporate leaving the oil behind which is why you still get the fried result.
What I thought was interesting was at the end in the video clip they showed the holes in the dough still having the moisture of the water/oil in them so that mixture in the indentations doesn’t evaporate completely which was what the Italian chef was commenting on about contrast in the crumb.
Discovered your blog recently and am loving your posts…this is a fantastic step by step guide to focaccia I like the crispy, almost fried crust effect too…something you also get on schiacciata which I love.
hi littleloaf- What is the difference between a focaccia and schiacciata? thanks
hi azelia,
it’s me again. Another great post – i always learn sth new from your blog! Never heard of this oil-water emulsion trick, very interesting. Another must-try. It does make sense what you say, to create a steamy condition such that the dough surface (esp since it’s so flat and with all that oil) doesn’t bake and set so rapidly. And I’m with you abt SD focaccias. I find that the SD element does get in the way of a fluffier, lighter focaccia, or at least what i have in my head abt what a focaccia should be. Look forward to your results!
a tip i picked up from, i think it’s Nancy Silverton, is to use a round tin to bake the focaccia. Since the dough tends to be rounded to begin with, it’s easier to stretch it out. Re the addition of malt, i havent read your earlier post, but i thought malt was added in the case of doughs that are fermented for a LONGER time, to unleash more sugar for the yeast.
if i’m not wrong, a schiacciata is what they call a focaccia in tuscany. There is a very popular version with grapes and aniseed. I have yet to try grapes but i’ve done a version with blueberries and rosemary, and i highly recommend that!
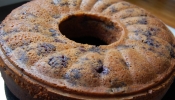
it’s a bad idea to read your posts in the vicinity of food. I blame you for the fact that i’ve just gone and eaten a whole quarter of a pugliese with cheese AFTER my dinner, just cos you got me thinking abt bread again. And yeah, that photo of the lovely, tall and soft apple cake DOES NOT HELP!!
(thanks for your reply on my previous comment. Ok, now i know what you meant by 24hr, 10hr leaven).
hi W – yes a twitter friend living in Rome afterwards said it’s commonly found in Tuscany and usually thinner than focaccia.
Yes I’ve read the same about long proved doughs but malt is added for flavour and colour in things like bagels which are also another short proved dough…and I found out it speeds up the process of proving…I have tested myself with and without malt…it will be in my bagel post part II which haven’t done yet.
All I can say with regards to reading about food is it’s even worse writing about it especially if doing before lunch or dinner!